Get Personal HUGO Website Up & Running using GitHub Pages

Being an engineer, it felt like home creating my website using HUGO. Since I enjoy writing in an editor more than a browser. It worked out quite well for me. I didn’t have to worry about a lot of things and I can customize it any way I want. I am looking forward to learning more about this. Here are the steps I followed to create my very first HUGO website.
Basic
HUGO is a super fast and secure static site generator framework created in GO language. It nearly takes around <10secs to generate 5000 posts with 5–6k file size. It seems extremely fast. Deployment can work using a lot of available hosting solutions like GoDaddy, GitHub Pages, GitLab Pages, Google Cloud Storage, Amazon S3, Azure, to name a few.
PreRequisites
Get a domain - GoDaddy, Google
Search a domain of your choice at Domain Providers such as GoDaddy or Google. For personal purpose stick to extensions like .com, .info, .net, .us Check the links:
Create a GitHub Account
GitHub is a code repository where you can checkin the code for your website. We can also use it to host static websites using GitHub pages.
Basic familiarity with coding languages like html, markdown files
HUGO Framework encourages to write in markup language which renders static files like HTML Some familiarity with coding languages can help us to debug in case of issues.
Markdown Files Basic Syntax
HTML/JS/CSS Tutorial
Basic understanding of DNS and Record Types
Domain Name System is written as DNS. DNS translates human readable domain names such as www.xyz.com to a machine readable IP address such as: 192.1.24.13. Read more about DNS from Wikipedia
There are various types of Records as you can find here. Your domain providers mostly allow configuring the following record types.
- Nameserver
- A
- CNAME
- MX
- TXT
- SRV
- AAAA
- CAA
For this project we will configure A records (to point to GitHub pages) and a CNAME record (your custom domain).
HUGO Quick Start Guide
Build your 1st HUGO website
1. Install HUGO on macOS:
brew install hugo
hugo version
2. Create a New Site
hugo new site myWebsite
3. Installing and customizing a theme of your choice.
HUGO Theme Site Installing the theme to site directory “myWebsite”
cd myWebsite
git init
git submodule add https://github.com/ertuil/erblog themes/erblog
You can find theme related details like updates, configurations etc in it’s documentation. For example,erblog theme
Customizing a theme
Edit config.toml file to update basic settings.

baseURL = "https://example.org/"  --- add your custom domain
languageCode = "en-us"
title = "My New Hugo Site"        --- update main title of the site
theme = "erblog"
4. Adding posts in markdown file format
There are 2 ways to add a blog post.
- Navigate to myWebsite/content folder. Add a post under posts directory with filename .md
- Use command line to add a post
hugo new posts/my-first-post.md

This will create a file with below details:
---
title: "My First Post"
date: 2020-05-15T22:47:11+01:00
draft: true
---
To make the post public set draft to false. Drafts don't get deployed, so remember to change it.
Write the post using markdown syntaxes.
5. Run HUGO Server locally to see the changes
hugo server -D
This will generate all the static files in the background. And initiates a web server in development mode reachable at localhost with port number as shown once you start the server. eg http://localhost:1313/
Once you edit the content, you can refresh the page to directly see the changes if not automatically. Clear cache if needed to load any content.
6. Generate Static Files Using HUGO locally
hugo -D

Output will be stored in ./public folder with all the static files.
7. Checkin the static files in your GitHub
Copy the content of the public folder to a gitHub repository with name: “username.github.io”. You can create the repository private or public, its up to you.
8. Configure your GitHub Account to use Pages
Go to settings and then section “GitHub Pages”. See the image -
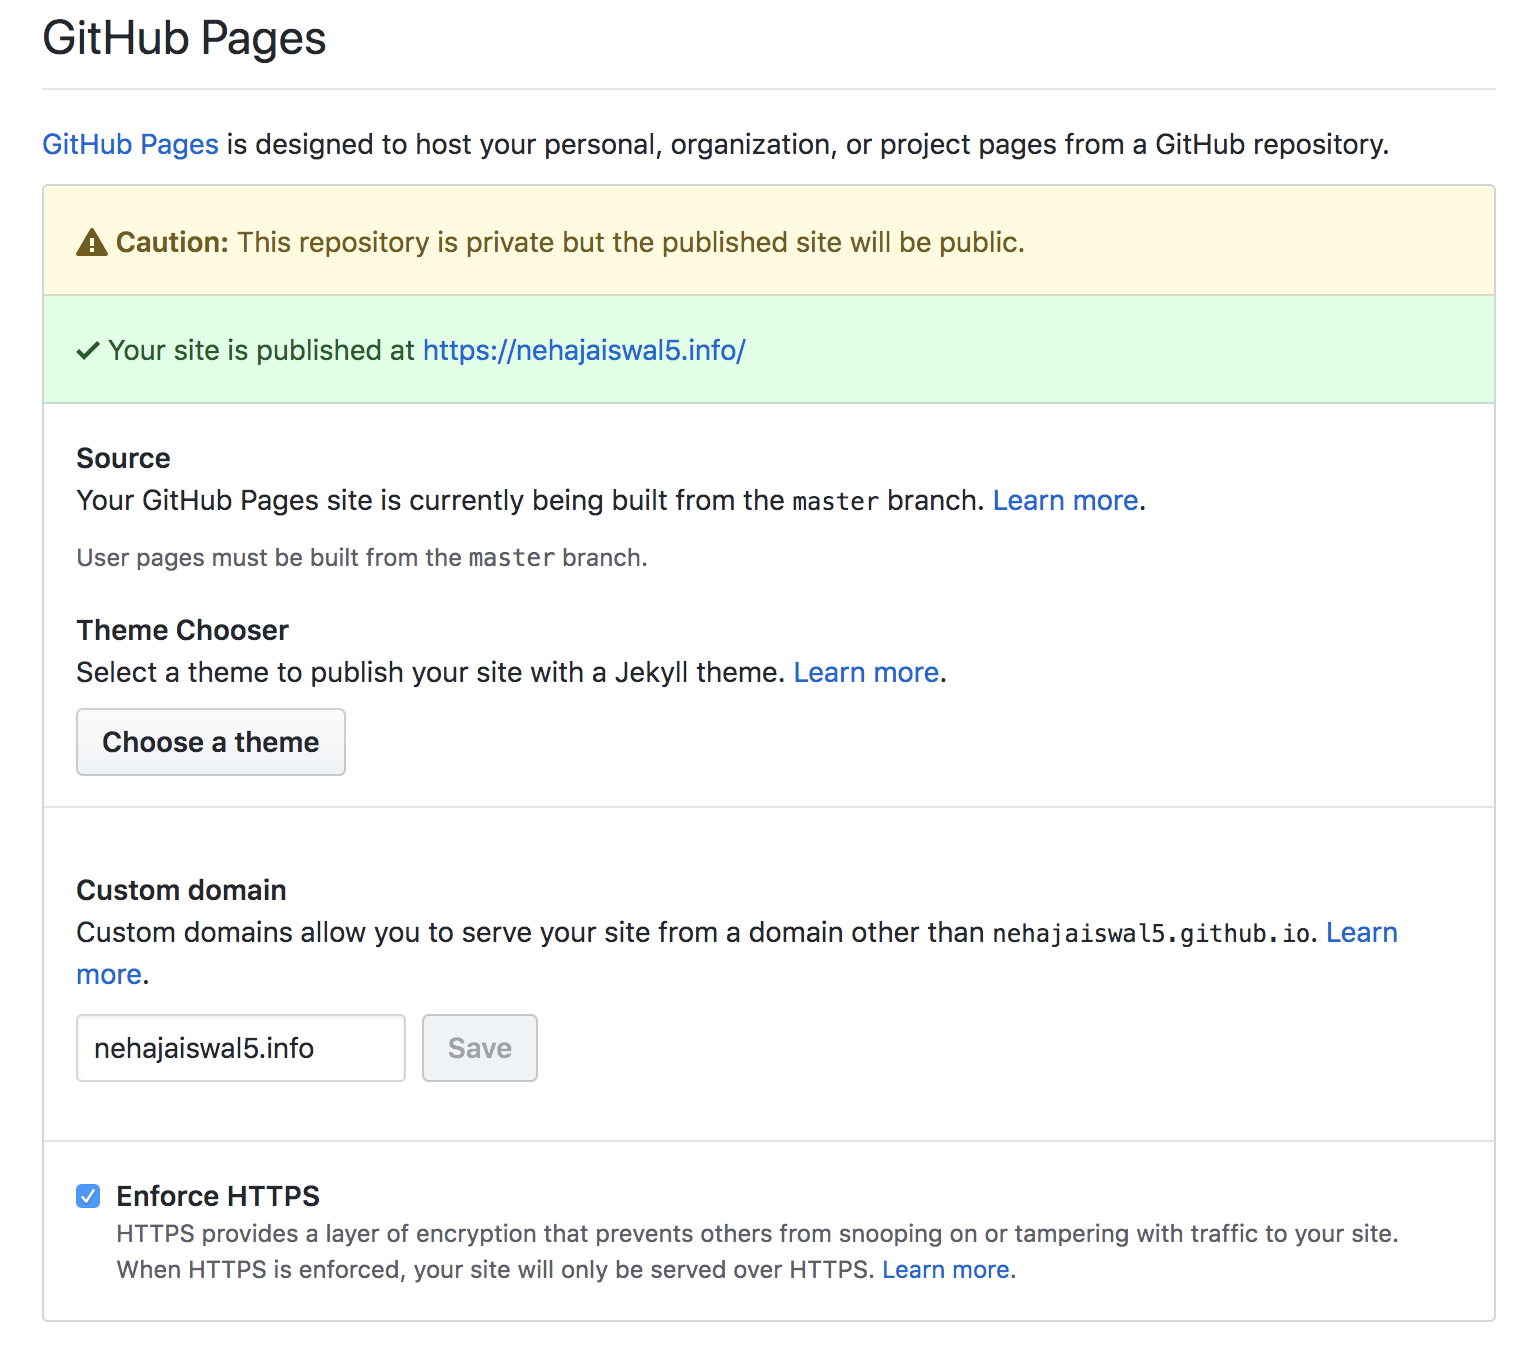
Enter your custom domain in the CNAME section. This will checkin the CNAME file in your repository that will be used to configure the DNS of the website. In order to enforce HTTPS, check the https box.
If all the configuration is done correctly, you see the green banner with text “Your site is published at… “. If you want to test it before pointing to external custom domain, keep it blank, then your site will be published at “http://username.github.io” by default.
Troubleshooting Custom Domains
10. Configure DNS provider
- Add A records: In order to make GitHub work, this is one additional step. Go to your domain provider and under manage DNS for your website domain. Add A record respect to GitHub pages. Do remember to verify the IP addresses as mentioned on GitHub. See image for details:
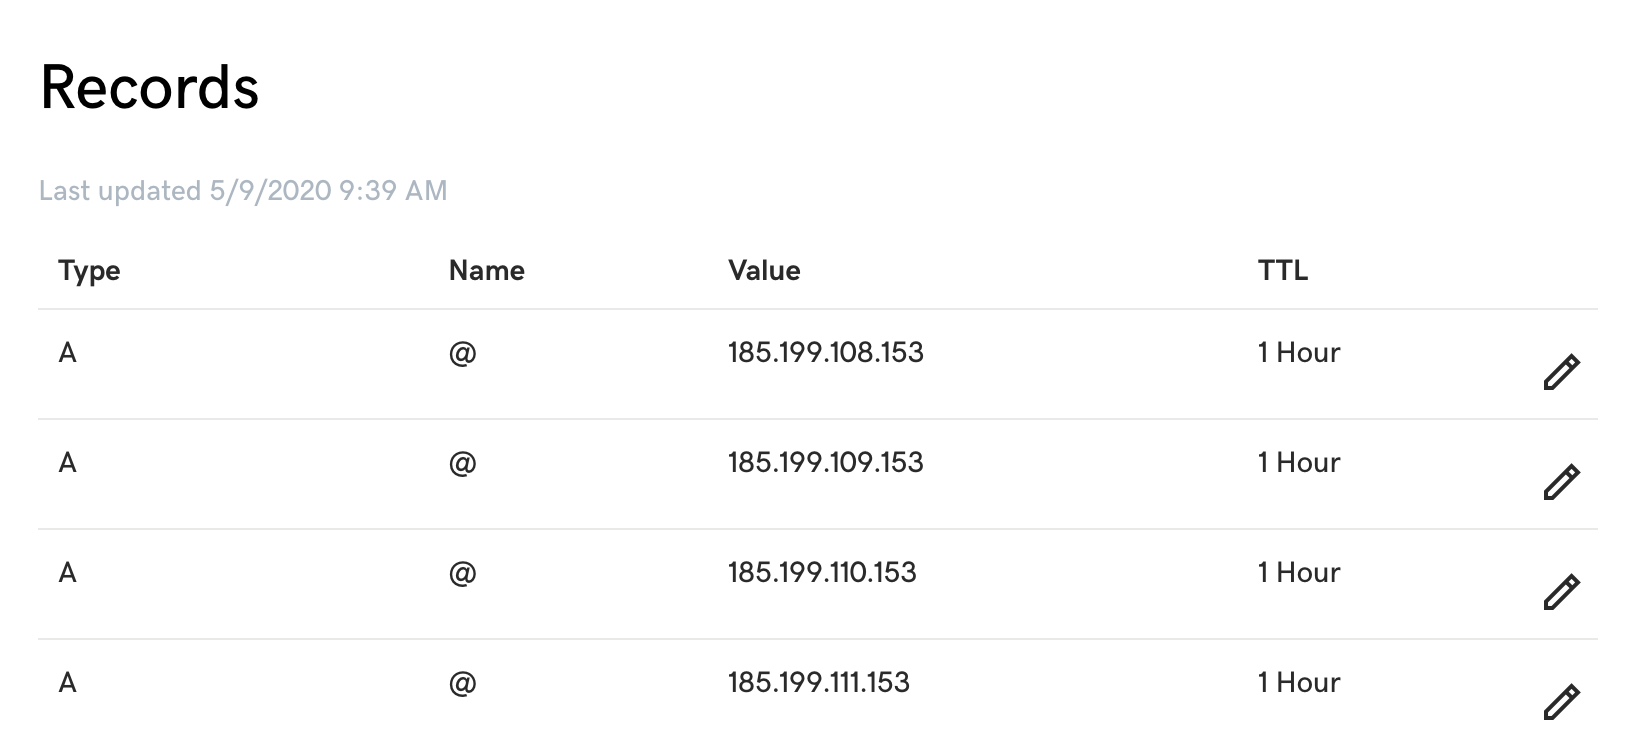
-
Add a CNAME for any subdomain you want to add and point it to username.github.io Click on ADD and enter details like below and save.
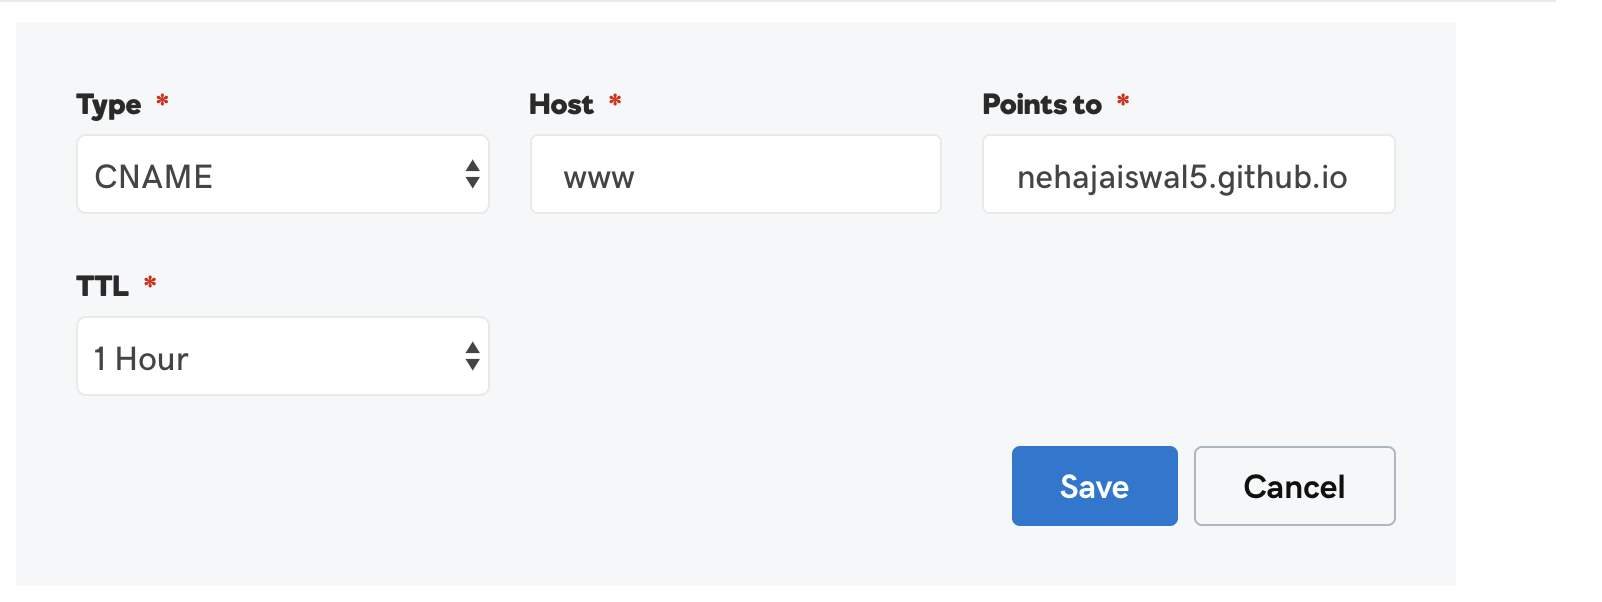
-
Run below command to verify whether DNS is configured correctly or not.
dig www.nehajaiswal5.info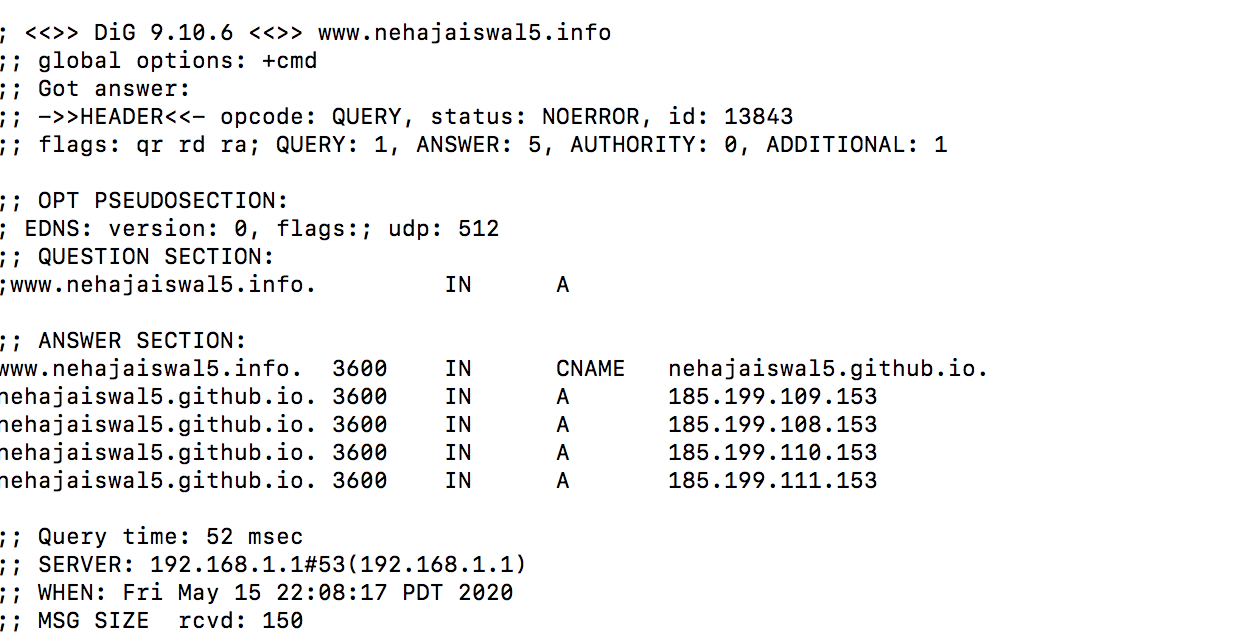
11. Get your website up and running
Load your site in browser and share! :)
12. 4 easy steps to make ongoing changes in your website
- Make changes
- Rerun hugo -D to generate static Files
- Checkin the static files to github repository
- Reload the browser to verify the changes.
I am still learning the HUGO framework and the GO language. It has been good learning so far. My current website is hosted here